Out of the Box & into the Land of Hexagonia!

Hi Friends! 
I have a small, time sensitive favor to ask... The brightly colored design below is my entry into Spoonflower's Hexagon Challenge. If you like it, will you visit Spoonflower's Contest page, locate my "Land of Hexagonia" entry and enter a vote for me? There are lots of pretty patterns to marvel at, so vote for your faves! (no need to log in ~ voting is open to the public) THANK YOU!! Voting ends tomorrow, March 28th! I know, I'm not giving you much notice, and if you're reading this after the due date, well I still want to share this fun design with you! It will soon be available on fabrics, wall paper & gift wrap. Almost all the elements in this design are made up of 6-sided hexagons in varying shapes. I enjoyed making this pattern, and it certainly stretched my imagination a bit since I tend to think in swirls, curves and flowing lines. :) Thank you for your support! 


Johanna-Parker-Land-of-Hexagonia

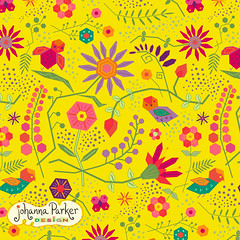
Cast your Vote... (thank you!)

Given the title of this post, I did find myself thinking outside of the box and submersing myself into a hexagonal land :) I've been obsessed with patterns all my life, and lately, I have felt the need to let them out. Imaginative patterns are often the last thing I see before I fall asleep and many times, the first image to greet me in the morning. So many fun and pretty patterned ideas flash through my mind each day that I'm lucky to capture and manifest just a tiny slice of what I dream. Visit my JohannaParkerDesign Spoonflower Shop to see what designs are currently available and also peek at my upcoming designs, for sale soon.

Enjoy & THANK YOU!

~ Johanna

Project Green Gables Update...

Hi all! It's time for an update... August has crept in, so I'm juggling all sorts of projects right now including our front gable design! I've been snapping a few "work in progress" photos of my steps along the way and will include those in this post. At this point,  each half of the gable is completely filled in with layers of papier mache. If all goes well, I have just one layer left to apply which will create the woody texture and other detailed elements in the scene. Stay tuned for more photos in a week or so...

Gable-Project-WIP


* After I pencil-sketched my design in place outside on the the front gables, JP removed the halves and brought them indoors for me to work on. Then, I roughly outlined the art in black marker pen.

Gable-Design-Oulined-Birds-WIP


* Scrolling vines, perching birds, dots, and....

Gable-Design-Oulined-WIP


* Flowers of course!.....

Gable-Vines-Layer-1-WIP


* After the lines were drawn, I spent a few days adding layers of papier mache skim coat to cover the plywood. I roughly filled in the spaces between the design with this layer build.

Gable-Sculpt-Layer-1-WIP


* Once the base dried, I began filling in the elements with a thick layer of papier mache to create dimension...

Gable-Bird-Layer-1-WIP


* The shapes and characters started to pop with this step! All have been drying out in the sun, awaiting the last layer of papier mache that will create the dimensional texture I hope to achieve. Wish me luck, and check back for more updates soon! (And yes, Jack enjoyed watching me work in a novel place. He was initially intrigued with my project, although I think he's sleeping in this photo :)


6 Ways to Bestow Spring in a Mug!...

Spring is certainly a time of celebration and smiles as mother nature slowly wakes up from her long winter's nap. I always look forward to the warming of the mornings and the chance, to at last, take my hot cup of coffee or tea outdoors and explore the latest buds and blossoms in the garden. It's a lovely way to wake up and start the day. As the two go hand in hand, I thought I would have a litte fun and share with you 6 Sweet Ways to Give the Gift of Spring in a Mug! I currently have 2 illustrated mugs available in my Zazzle Shop that promise to make the perfect spring gift to both family and friends (or yourself!). Whether it's in celebration of Easter, the changing of the seasons, a birthday, a thank you, a hostest gift or just an act of simple kindness, these suggestions promise to bring smiles to those you share them with. The mugs are certainly custom and unique and serve as a functional base and vase for whatever you choose to fill it with in your presentation. The ideas are certainly endless, and if you have more, please feel free to share them here with our readers. Enjoy and THANK YOU for spreading smiles through my art!

~ Johanna

Daffodil-Chick-Mug

* Idea # 1 gets top ranking with me as it is probably the easiest and most cost effective to produce. Plus, the results are so dear! Spring invites a whole host of flowering bulb plants that often pop up all over the landscape. Snip a few from here or there. Daffodils are always a favorite, so just trim them to height and place in water. If your flower-filled mug must go on a journey before it is gifted, then anchor your flowers in wet floral foam, cut to size. This keeps those pretties fresh and firmly grounded while eliminating the splashing of water and potential spills.

Bunny-Lollipop-Mug

* Although Idea # 2 takes a little more work, the results are too sweet for words! A tuft of fresh wheatgrass spells out spring, and health-minded folks love to juice it in their smoothies. Wheatgrass can be found at most health food grocers in the produce section. Purchase a square of it and cut it to size and stuff it into your mug. Alternatively, with more time and patience, you can grow your own with organic soil and wheatgrass seeds. With a little care, your grass will be perky in 10 days or less. I poked a pink lollipop in for pizazz, but again the ideas are endless. The recipient can keep the lively mug in their windowsill till the grass is used or fades, or they can even share it with their feline friends who also adore this green treat. In the end, they are still left with an adorable mug. Just wash well and enjoy!

Bird-Cocoa-Bean-Mug


* Idea # 3 is the choice for your chocolate & coffee loving friends! I chose dark chocolate covered coffee beans to go with the coffee mug theme. A simple cellophane bag and pretty bow will do the trick. Other suggestions may be chocolate covered nuts or other cocoa-themed sweets. Take it a step further and fill a cellophane bag with homemade chocolate chip cookies ~ YUM! Now, that woud certainly taste quite delightful with a cup of spring coffee in one of my sweet mugs :)

Bunny-Carrot-Mug

* Idea # 4 is certainly for those with a sweet tooth! Fill carrot cellophane bags with orange jelly beans and ground them in a base of spring green paper packing grass. These bags are easily found online. Do a search for "cone shaped cello bags" or "carrot cellophane bags" and you should find a variety of vendors offering cone shaped packaging, perfect for this sweet application!

Bird-Peep-Mug

* Idea # 5 takes sugar to a higher level of sweetness! Make a bouquet that celebrates the well-known "peep"! Poke these marshmallow bunnies or chicks into wooden skewer sticks, cut to length if necessary and anchor them into a mug fill with spring-hued candies, such as M&M's. What an adorable hostess gift this would make at a spring party. Suddenly, your unique gift takes center stage!

Chocolate-Bunny-Mug

* And Idea # 6 showcases the traditional chocolate bunny. Make sure to purchase one that will fit snuggly in your muggly :) With a little spring green construction paper and scissors, cut a continuous strip of zig-zaggy paper grass. Cut to fit the diameter of your mug, tape it end to end and tuck it down & around your bunny. If you find him wiggling around too much, tuck a little tissue paper down below and around him to set him just right, and add those decorative blades as your final touch!

I hope I have inspired you with these 6 Sweet Ideas to Bestow Spring in a Mug! As I said earlier, please feel free to comment with more fun ideas. Sharing is caring, and it is always FUN to hear from you.

Now, go pick up a SPRING MUG or 2 from My Zazzle Shop!  Thank you for your support & kindness...

Follow Me on Pinterest

Twin Boxes of Cheer...

It's the simple things in life that bring me joy. After JP constructed our beautiful custom potting shed last year, I put in my request for a pair of basic window boxes that I could fill with flowers. Of course, it wasn't a priority, but more like eye candy for me to peer at each day from our sun room window. Luckily, with his woodworking skills and a little time to devote to my "needs," he was able to make them this month! He painted them green, and I filled them with red petunias, purple lobelia and creeping jenny. Now, every time I glance out back, I get an extra dose of cheer! Thank you JP :-)

~ Johanna


* Creeping Jenny & Purple Lobelia blooms begin to cascade over the edges of each window box... I just love these cheerful colors!


* Next on my list is to find some rusty salvaged elements that I can decorate the fronts of each box with and perhaps a wall ornament to live in between the two windows. I won't know what they may be until I find them!


* The stone path and "stage" as I call it was also created by JP which leads the eye and the foot to our fun potting shed...